
Data Structures : Doubly Linked List Explained & Implemented in Java
Thursday, July 1, 2021 Posted in Computer Science FundamentalsTags : Data-Structures Implementations Lists
This post is an attempt at explaining the theory behind, and implementation of the most fundamental Data Structure, the Linked List in Java
The Linked List data structure is found in many programming languages by default like Python, Java, Javascript, PHP and many more, fully implemented and performance optimized, and is the first choice for many to organize their data compared to other data structures, as compared to it’s more rigid predecessor, the Array.
</script>
What is a Linked List
A Linked List is a data structure that consists of nodes attached to each other via references, this gives this data structure a unique set of advantages compared to the Array, in the sense that a Linked List is elastic and can start at and expand to any number of elements, and these elements do not have to be pre declared, a Linked List can also contain data of any type as compared to an array, and insertion, deletion of more nodes into a Linked List is also faster. Linked List nodes can be stored in any part of memory, as compared to Arrays which need to have a contigous chunk of memory allocated to them, the size of which is determined by the declaring of the array.
Doubly Linked List Theory
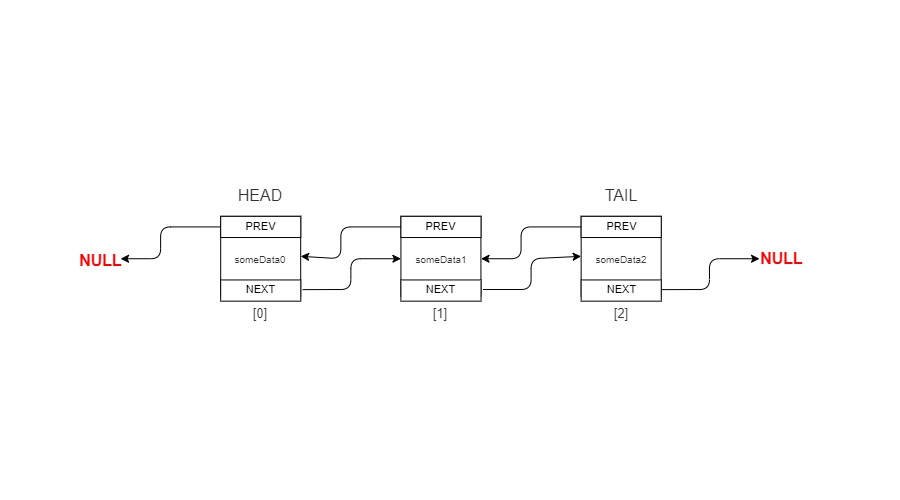
A Doubly Linked List is made up of Nodes, each Node has 3 fields, a Previous field, and Next field and the Data field, the Previous field points to a Node before it, or Null if the Node is the first Node or Head of the list, And similarly for the Next field which points to the Node after it, or to Null if it is the Tail or last element of the List, These links to the previous and next help us iterate both ways last-to-first and first-to-last of the Array, rather than flowing only one way as with Singly Linked Array
The Diagram below should clear things up, showing a zero-indexed Linked List that is 3 nodes long.
Doubly Linked List Implementation in Java
We will now Implement the Doubly Linked List in Java to get a better understanding of it, aside from the List itself, this implementation will contain various functions like append, prepend, insertAt for insertions, and removeFirst, removeLast and removeAt for deletions, along with a display function to print out all list elements from first to last, and a displayReverse function to print from last to first.
We will implement two core classes for purpose, one is the Node class which will describe an individual node in our list, with it’s previous, next and data fields, the other is the DoublyLinkedList class which will have our Linked List and it’s associated insertion and removal functions.
The Node Class
We first start with creating a file called DoublyLinkedList.java and adding the following code to it.
package LinkedList;

// Node Class, a node is an element of the Linked List
// Nodes are chained together using next/previous fields to make a Linked List
class Node {

    // Node data
    public String dataKey;
    public int dataValue;

    // Reference to next node after this one
    // if this node is the last one, this is set to null
    public Node next;

    // Reference to previous node before this node
    // If this is the first node, this is set to null
    public Node previous;

    public Node(String dataKey, int dataValue) {
        this.dataKey = dataKey;
        this.dataValue = dataValue;
    }

    public void display(int index) {

        System.out.println("["+index+"] "+dataKey + ": " + dataValue);
    }

    public String toString() {
        return dataKey;
    }

}
We will be using a seperate file called Driver.java, which we will use to test our linked list data structure and it’s functions, so to use the Linked List described in this file, we add package LinkedList to both of these files, next we start out with our Node class, for the sake of simplicity, all functions and fields are public in this class, aside from this we have a Node() constructor function that takes dataKey and dataValue parameters and a display() function that prints out the node’s dataKey and dataValue fields along with a supplied index.
You may have noticed that our “refererence” or “pointer” fields next and previous both have a type of Node, because in Java there exists no memory referencing and dereferencing via pointers like it is in C, so our next and previous are in reality also Node objects, with they themselves having next, previous and dataKey, dataValue fields.
It is helpful to think of this implementation of a Node in a Linked List as a Matyroshka doll, this is a Russian “nesting doll” i.e. it is a doll within a doll, as in the picture, the largest doll contains a smaller doll and that doll contains another smaller doll inside it.

In a similar way the head or starting node contains a field next which itself is a Node object containing the data and it’s own next and previous fields, the next again is another Node object, so on and so forth.
For example if there is a linked list of the size 5 nodes, to access the last node that is at index 4, you could use such a piece of code which starts from the head node, however ugly.
Node node = head;
System.out.print(node.next.next.next.toString());
I have color coded the next field that is a Node object and the Node it contains or “references” in the below diagram for easier understanding of the nested object implementation of Nodes in a Linked List

This might be still a bit hard to understand, but it will get clear when we start with building out our LinkedList class and it’s basic add() and display() functions
The DoublyLinkedList class
The below code is a very bare bones and basic Linked List implementation, to illustrate the core concept of how the nodes link with each other in the List, later we will see more advanced operations on the Linked List, paste the following code into your DoublyLinkedList.java file just after the Node class.
public class DoublyLinkedList {

    Node head;
    Node tail;
    int size = 0;

    // Checks if List is empty
    public boolean isEmpty() {

            return(head == null);
        }

    // Prints every element in the list to screen
    public void display() {

        Node currNode = head; // First node is set to head

        for(int i = 0; currNode != null; i++) { // loop till currNode is not null

            // Display the node's contents
            currNode.display(i);

            // Display next Node
            System.out.println("Next Node is " + currNode.next);

            // Set CurrNode to next Node
            // when currNode.next is null, the loop terminates
            currNode = currNode.next;

            System.out.println();
        }
    }


    // Append() adds a new Node to the back/tail of the Linked List
    public void append(String dataKey, int dataValue) {
        Node newNode = new Node(dataKey, dataValue);

        if(isEmpty()) {

            head = newNode;
        } else {

            // List isn't empty, current Tail's next is set to the newNode
            tail.next = newNode;

            // newNode's prev set to current tail
            newNode.previous = tail;

        }

        // newNode becomes the new Tail
        tail = newNode;

        size++;
    }
We will go over the append() function, which is how we add nodes to our linked list, this function adds new nodes to the back of the list, with the freshly added node becoming the new tail of the list
// Append() adds a new Node to the back/tail of the Linked List
    public void append(String dataKey, int dataValue) {
        Node newNode = new Node(dataKey, dataValue);

        if(isEmpty()) {

            head = newNode;
        } else {

            // List isn't empty, current Tail's next is set to the newNode
            tail.next = newNode;

            // newNode's prev set to current tail
            newNode.previous = tail;

        }

        // newNode becomes the new Tail
        tail = newNode;

        size++;
    }
We first instantiate a new Node object very creatively called newNode, then if the List is empty with no Nodes in it, we set newNode as the head, exit this if-else branch, set newNode as the tail, and increment the size variable, which tells us the length of our List.
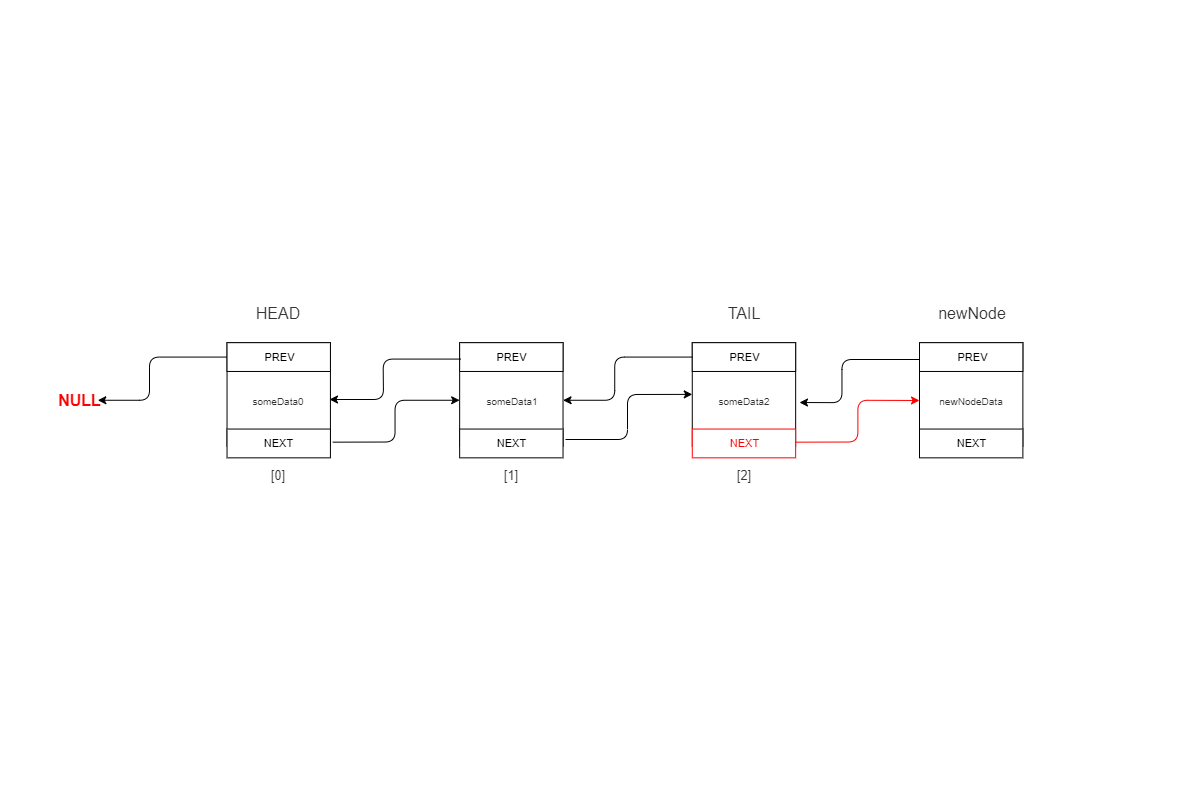
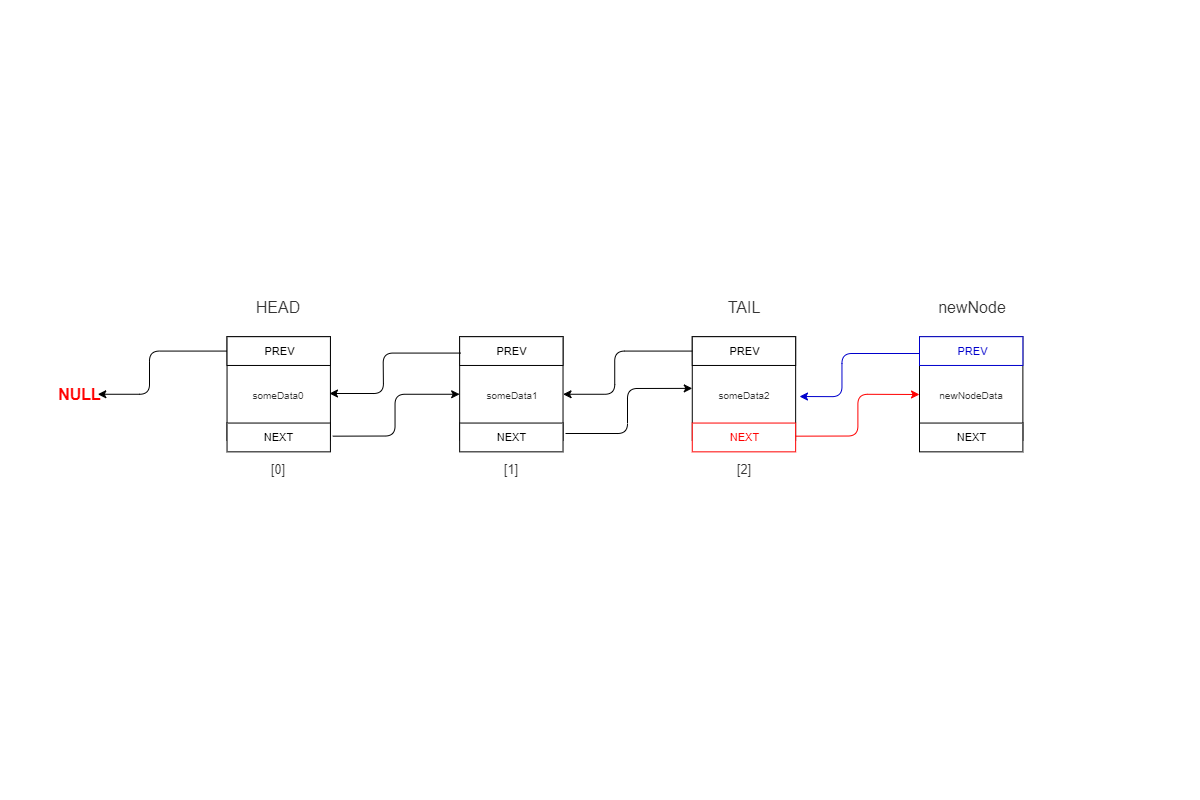
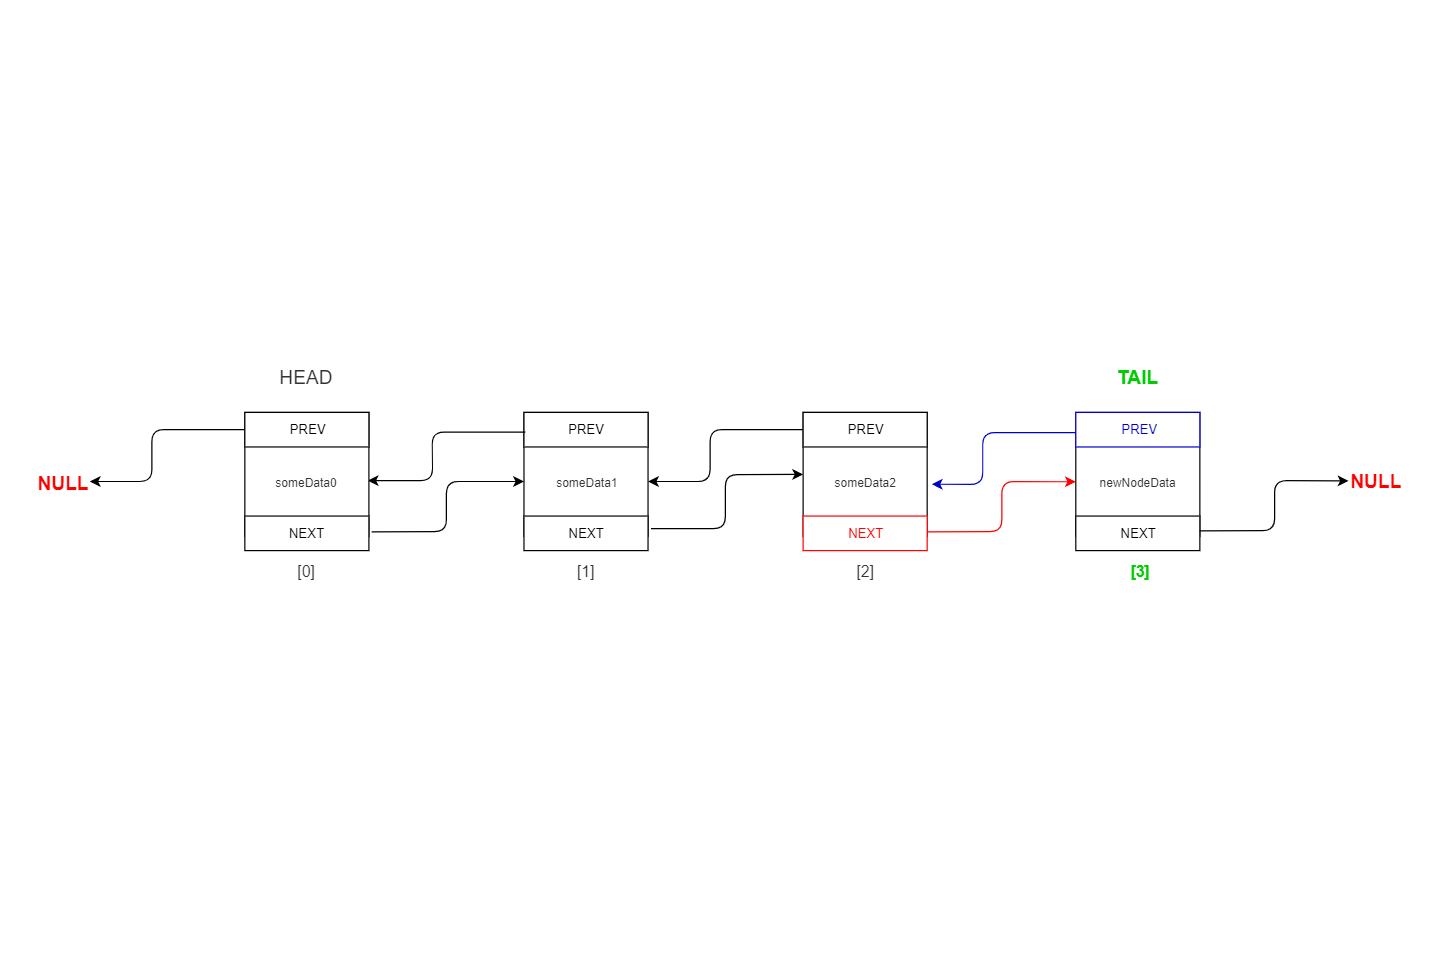
Else, if the List is not empty the current tail node’s next is set to the newNode that we created, and the newNode’s previous is set to the current tail node, lastly, we set the newNode to be the new tail node and update the size variable
The below image gallery of three diagrams should help you understand each line of code in the else branch and outside it better.
Now that we can add nodes into our List, we must find a way to display or print all nodes of the list to the screen, the code for this comes from the display() function as shown below.
    // Prints every element in the list to screen
    public void display() {

        Node currNode = head; // First node is set to head

        for(int i = 0; currNode != null; i++) { // loop till currNode is not null

            // Display the node's contents
            currNode.display(i);

            // Display next Node
            System.out.println("Next Node is " + currNode.next);

            // Set CurrNode to next Node
            // when currNode.next is null, the loop terminates
            currNode = currNode.next;

            System.out.println();
        }
    }
This code is simple to understand, we first start out by setting our currNode to head, starting from the first node in our list, next we have a simple forloop that will continue to iterate through the list till currNode is null.
The variable int i in this loop is the index of each node, which is then supplied to currNode.display(i), which will print out the key, value and index of the current node out to the screen
We then have a print statement that will print out the next node, which is currNode.next, we then assign currNode.next to the currNode variable, advancing the “count” of the loop towards the end condition of currNode != null, since the next field of the tail node or last node in the list always will point to null, ending the loop.
This completes the core input-output features of our Linked List, and we will now test out these two functions, before moving on to writing functions for more complex operations on the Linked List
Testing our Linked List
Create a file called Driver.java in the same folder as your DoublyLinkedList.java, and add this code
package LinkedList;

public class Driver {
    public static void main(String[] args) {
        DoublyLinkedList theLinkedList = new DoublyLinkedList();

        theLinkedList.append("Mango", 1);
        theLinkedList.append("Banana", 2);
        theLinkedList.append("Orange", 3);
        theLinkedList.append("Pineapple", 4);

        theLinkedList.display();

        System.out.println();

        System.out.print("Linked List Size : "+theLinkedList.size);

        System.out.println();

    }
}
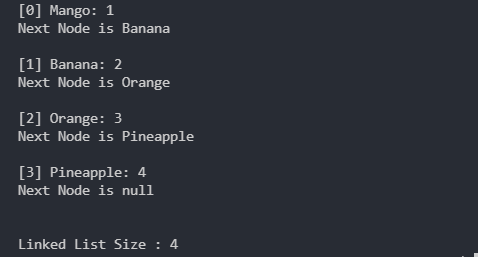
This is a simple program really, first theLinkedList is instantiated from our DoublyLinkedList class, we then call it’s append() method to add 4 nodes to it, i’m using fruit names and numbers for the parameters, you can use any string and int you’d like, we then call the display() method to print out all our nodes and their data, lastly we print out theLinkedList.size which shows the length of our list, which will be 4.
The output should look like this.
More Linked List Operations
Since we have completed the basic functions of the LinkedList class, we will now move on to more complex ones, first up is a similiar method prepend()
// Append() adds a new Node to the back/tail of the Linked List
    public void prepend(String dataKey, int dataValue) {

        Node newNode = new Node(dataKey, dataValue);

        if(isEmpty()) {

            tail = newNode;
        } else {

            // List isn't empty, current Head's previous is set to the newNode
            head.previous = newNode;
        }

        // Next pointer of newNode being set to the current Head object
        newNode.next = head;

        // newNode is then set as the current Head
        head = newNode;

        size++;
    }
This method is like the append() method but it adds a new Node to the front of the List, rather than the back, i.e the new node is inserted before the current Head Node or first Element in the List, and the newly inserted Node is made the new Head, and the previous and next links of the previous Head node are adjusted accordingly.
Inserting a New Node at a specified Index
The next method is fairly complex, called the insertAt() method, what this does is it inserts a new Node into the given index of the list, if there was another node in that index, it is shifted rightward, the new Node is inserted in it’s place, previous and next fields and adjusted accordingly and the size is incremented by one.
 // Inserts node at specific index in the list, node at this index is shifted rightward

    public boolean insertAt(int index, String dataKey, int dataValue) {

        return true;
    }
The above is a skeleton function, you can add the lines of code inside it as they come below.
First we instantiate our newNode object from the given dataKey and dataValue parameters, then we declare another Node object called current and set it to the value of the head of the list.
        Node newNode = new Node(dataKey, dataValue);
        Node current = head;
A simple for loop iterates then through the list till the Node at the given index is found, the node in the loop is advanced to the next node through the current = current.next; snippet
        for (int i = 0; i != index; i++) {
            current = current.next;
        }
Once this Node at it’s index is found, we then have to insert the newNode onto it’s location.
newNode.next = current;
The next field of our newNode is set to the current node, because our current node will be shifted to the right, i.e it’s new position will be at index+1, so if it’s original position was at index 3, it will be at index 4 after this insertion operation completes.
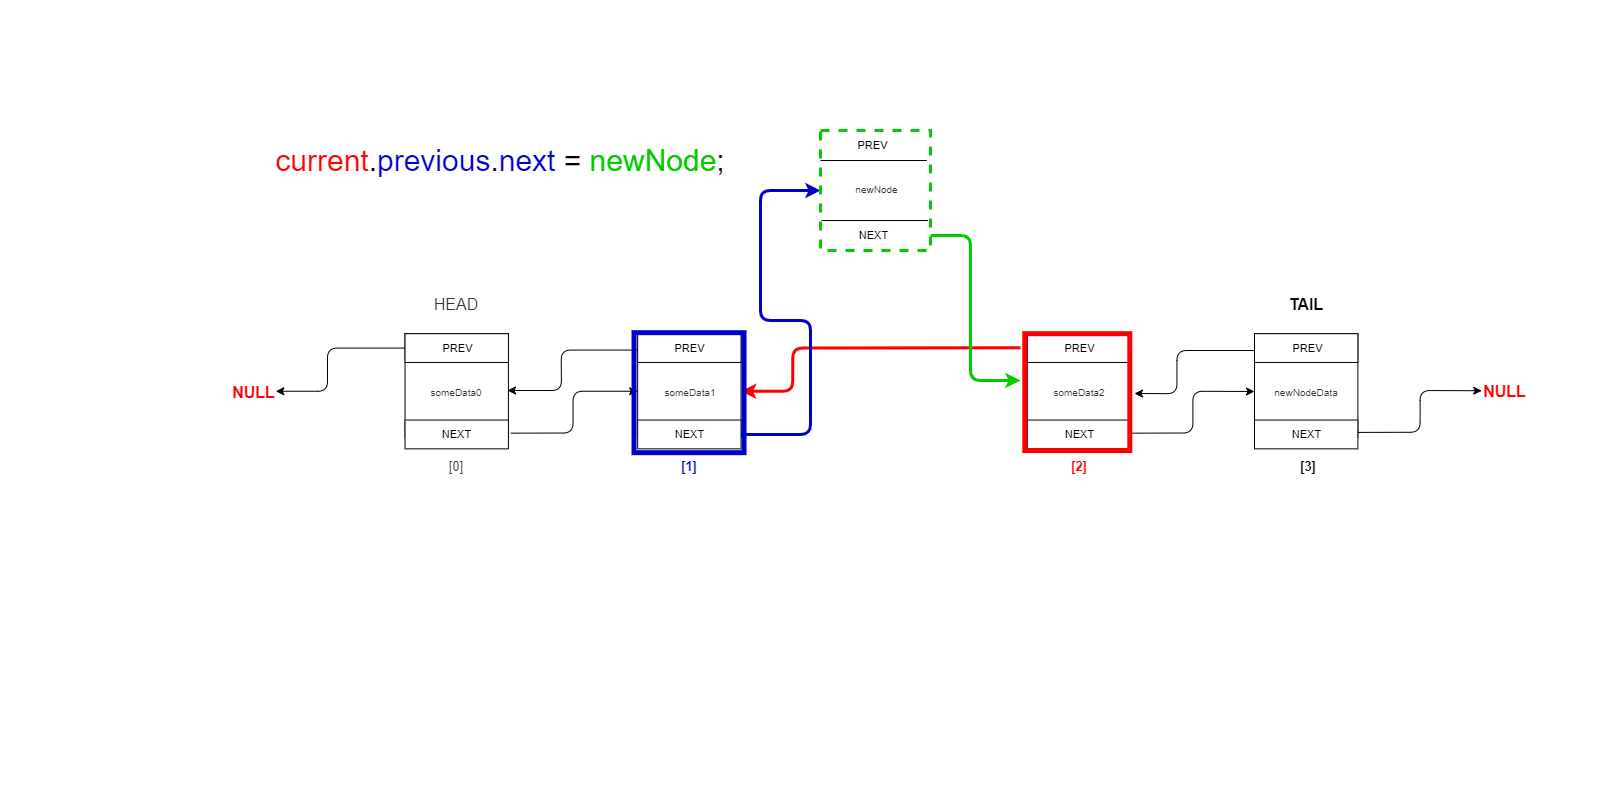
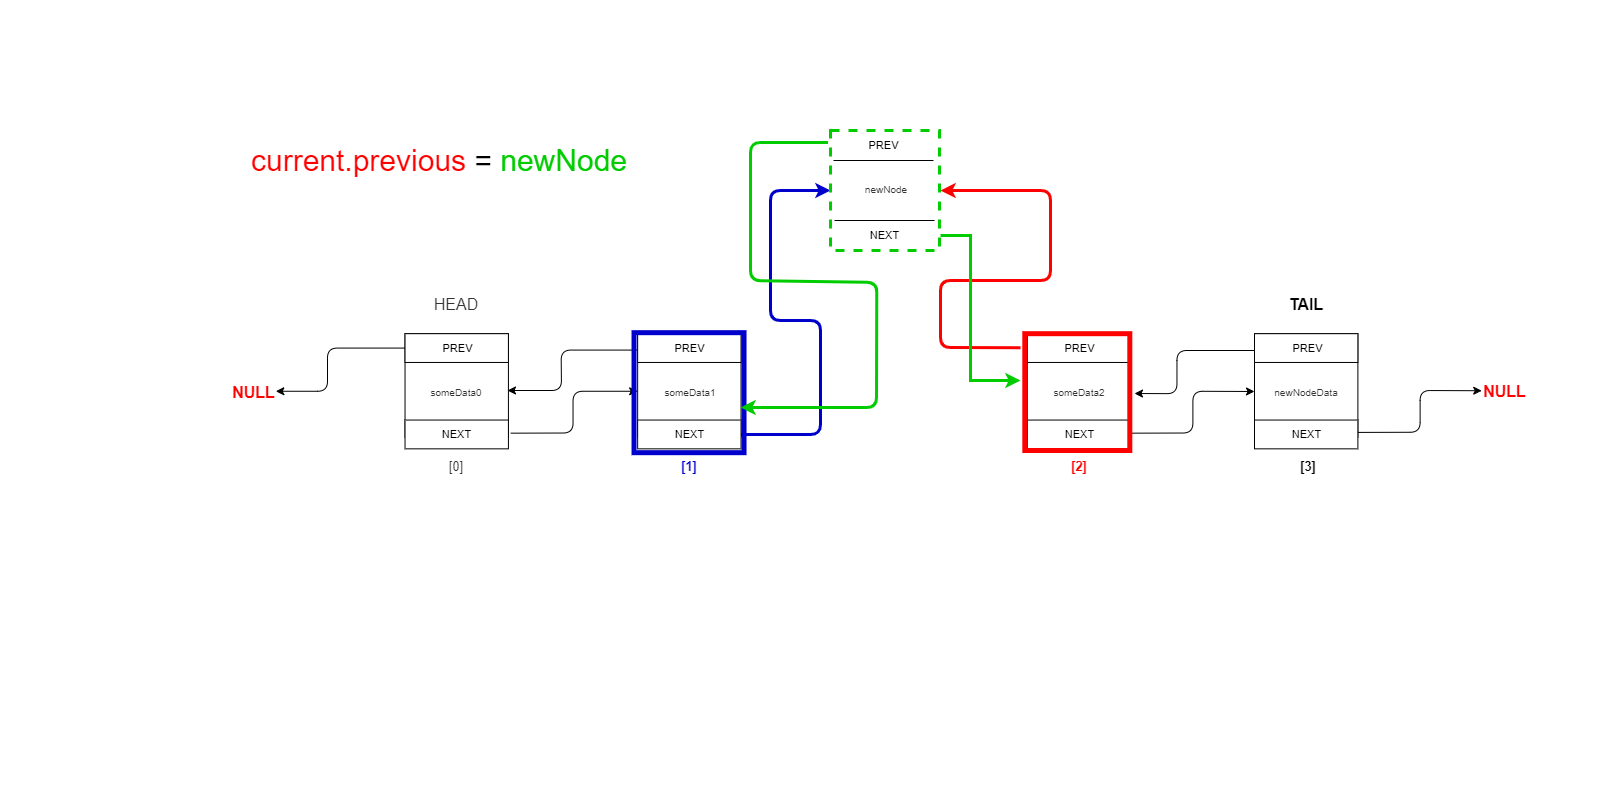
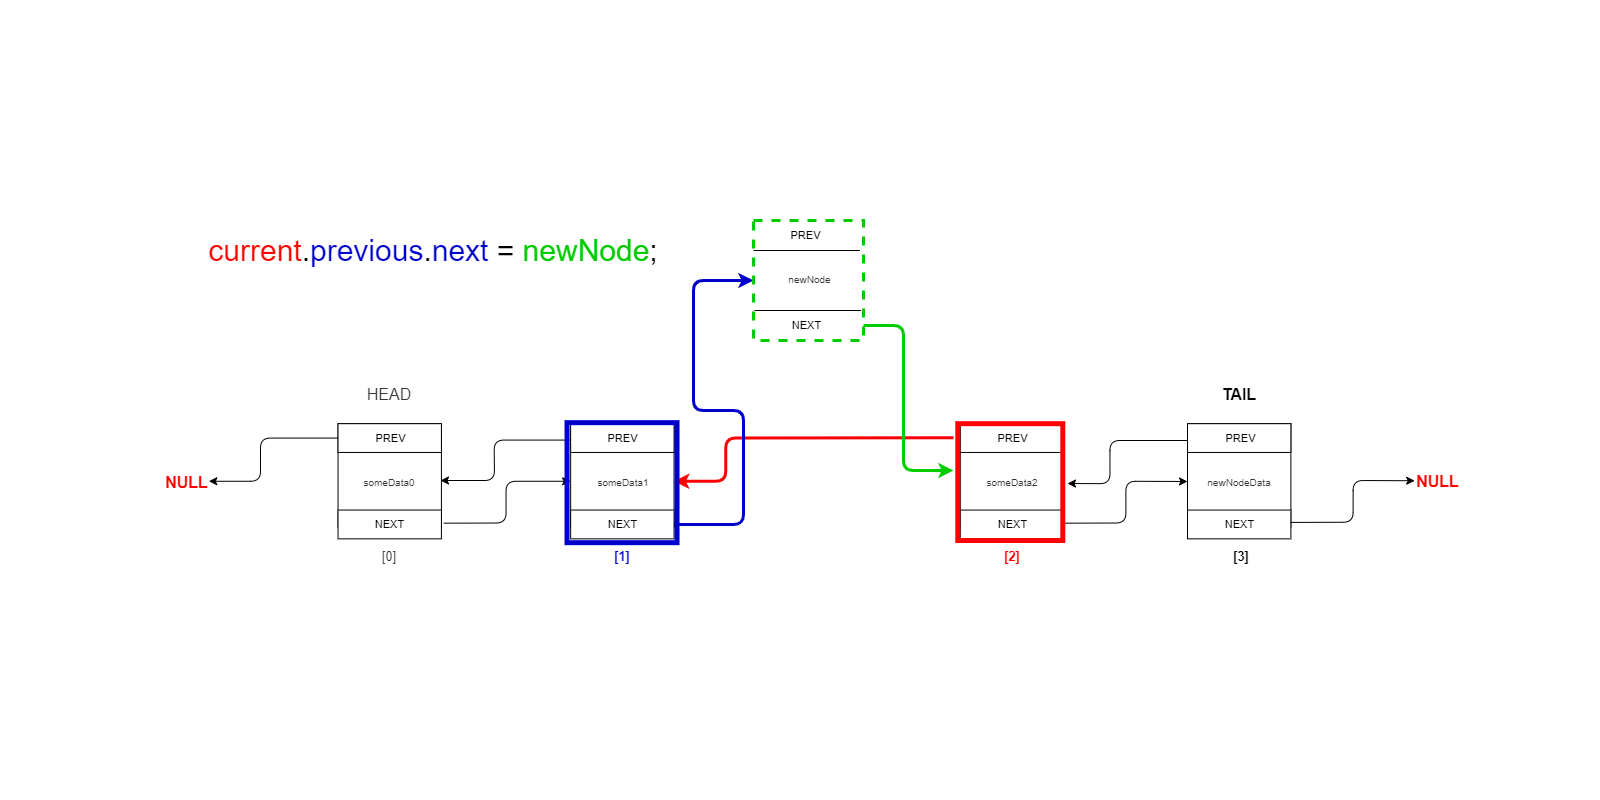
current.previous.next = newNode;
Then in this seeminly complicated code snippet, we set the next field of the node that comes before the current Node to the newNode, this Node is accessed through the current.previous snippet, and then the next, to assign the newNode to it.
This completes our insertion of our new node in the head-to-tail direction since both our next links have been adjusted, but if the list were to be iterated tail-to-head, we would see problems, to fix this, we also adjust our previous links on the affected Nodes to reflect the changes, and increment the size by one.
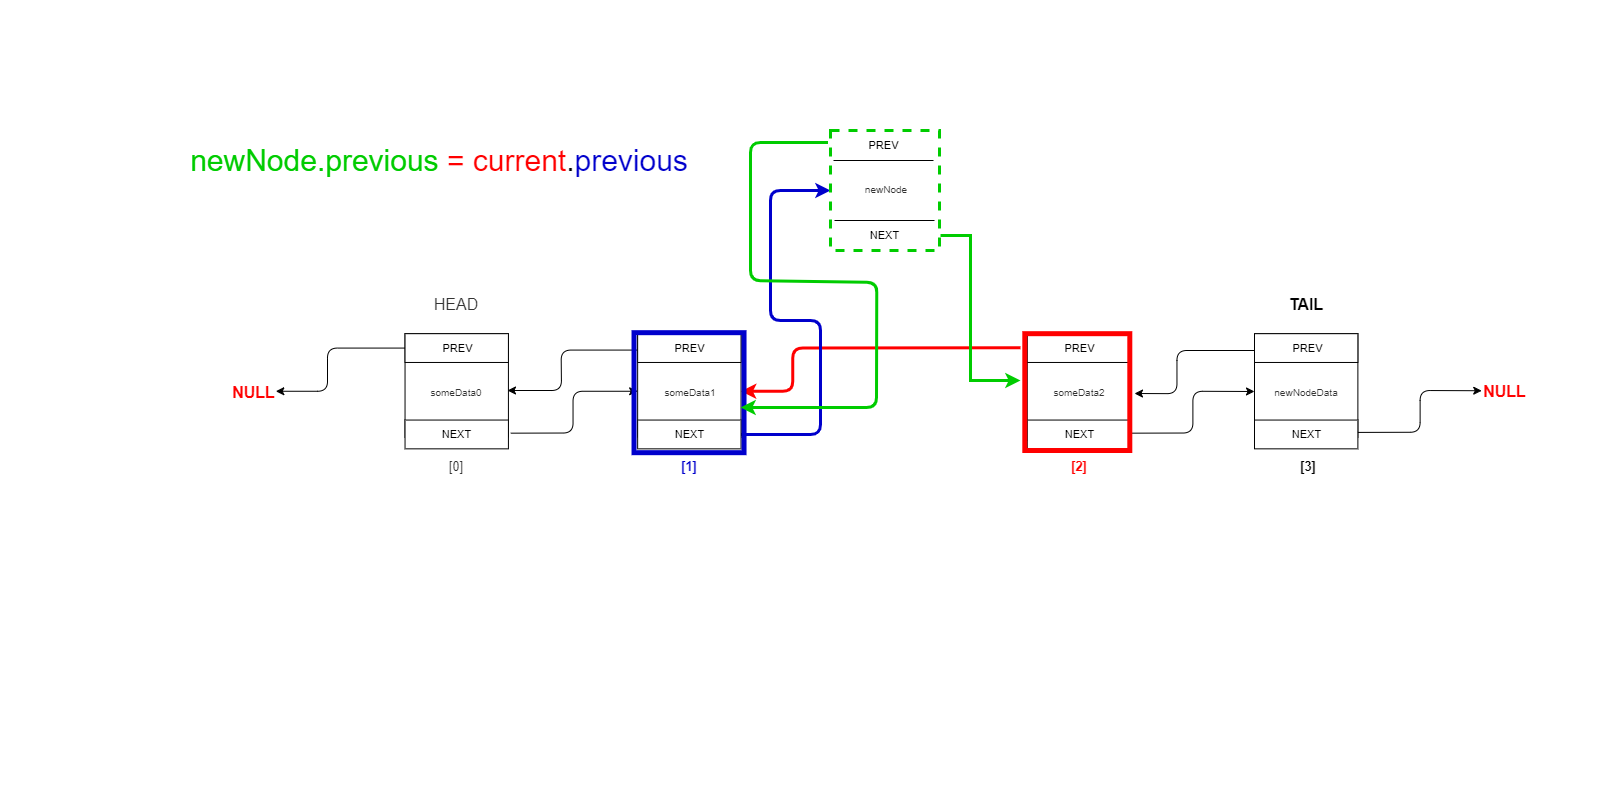
newNode.previous = current.previous;
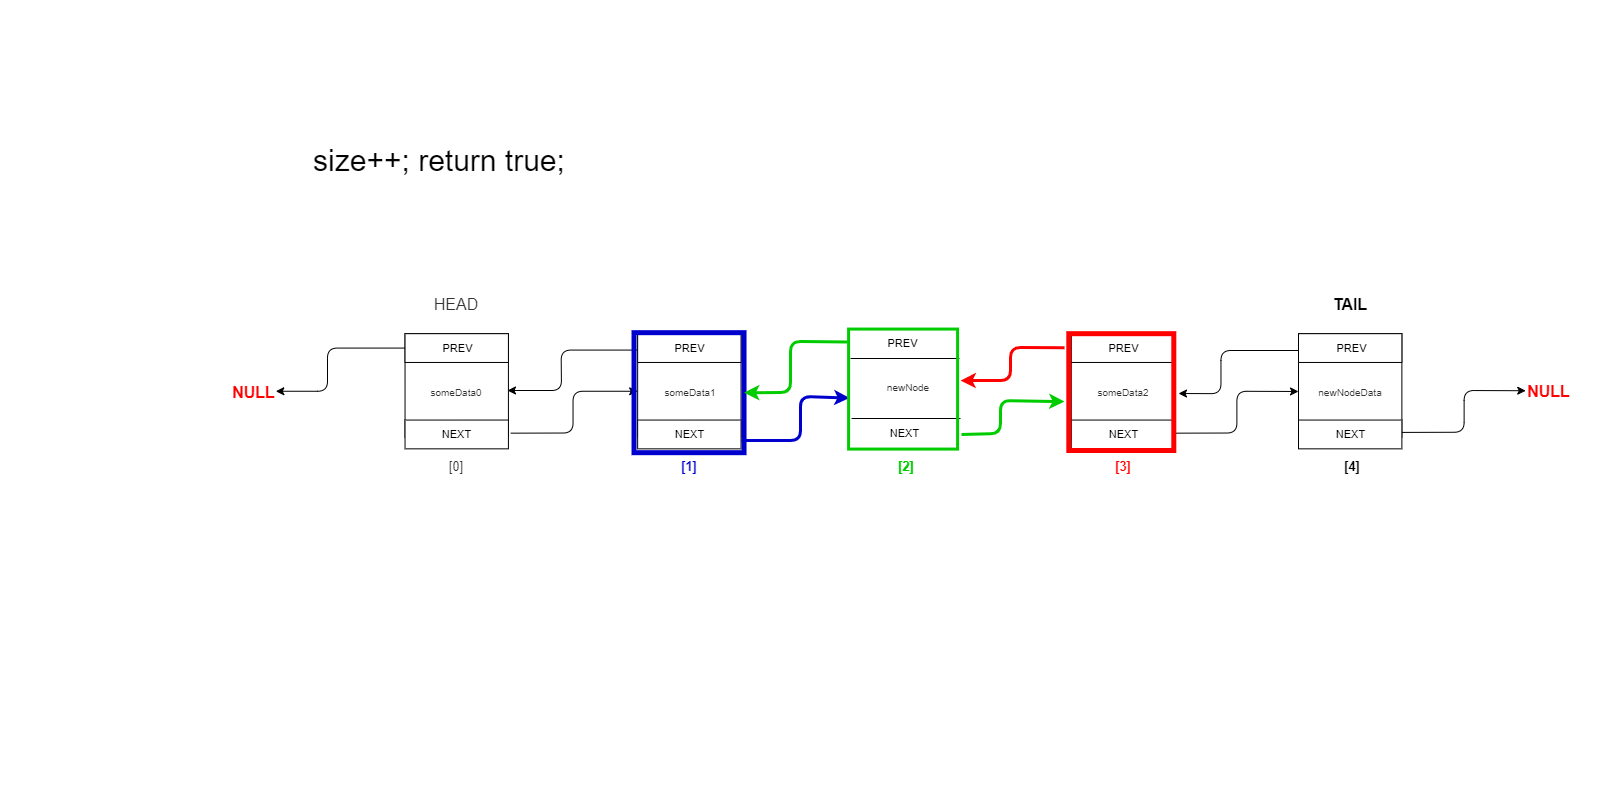
current.previous = newNode;
size++;
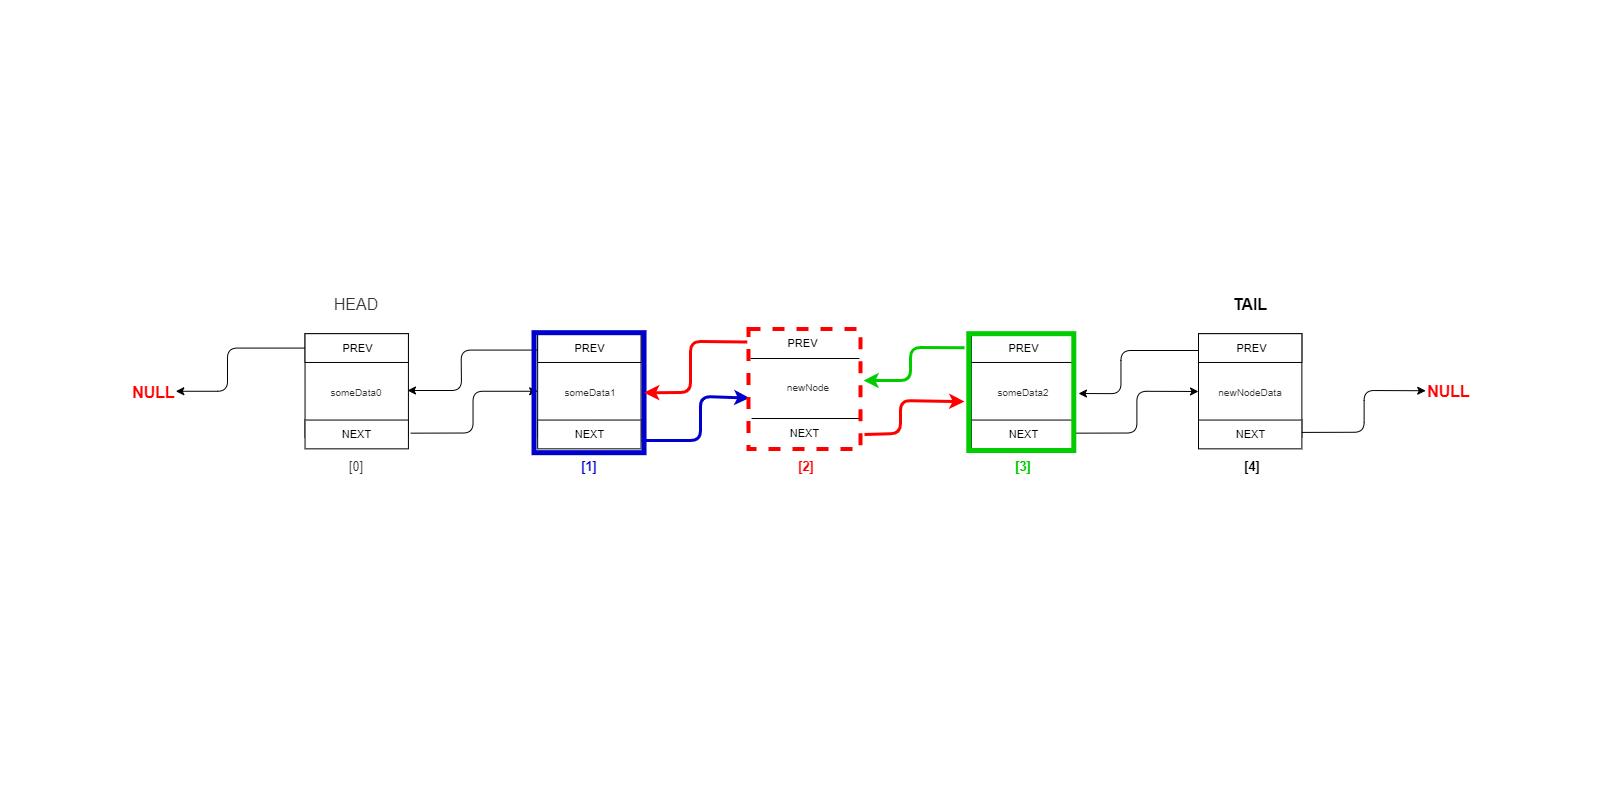
newNode’s previous field will point to the the node that comes before the current node, since newNode will take current node’s place in the list.
current’s previous field now points to newNode because newNode now is inserted at where current node used to be, but current node has now been pushed rightward, or one place more than where it was earlier, i.e index+1.
Lastly we increment the size variable, this completes our implementation of the insertAt() method.
Below we have a slide show, with each slide showing what each snippet of code does in visual form of the insertAt() method, you can double click on each image to or on the fullscreen icon to make it fullscreen
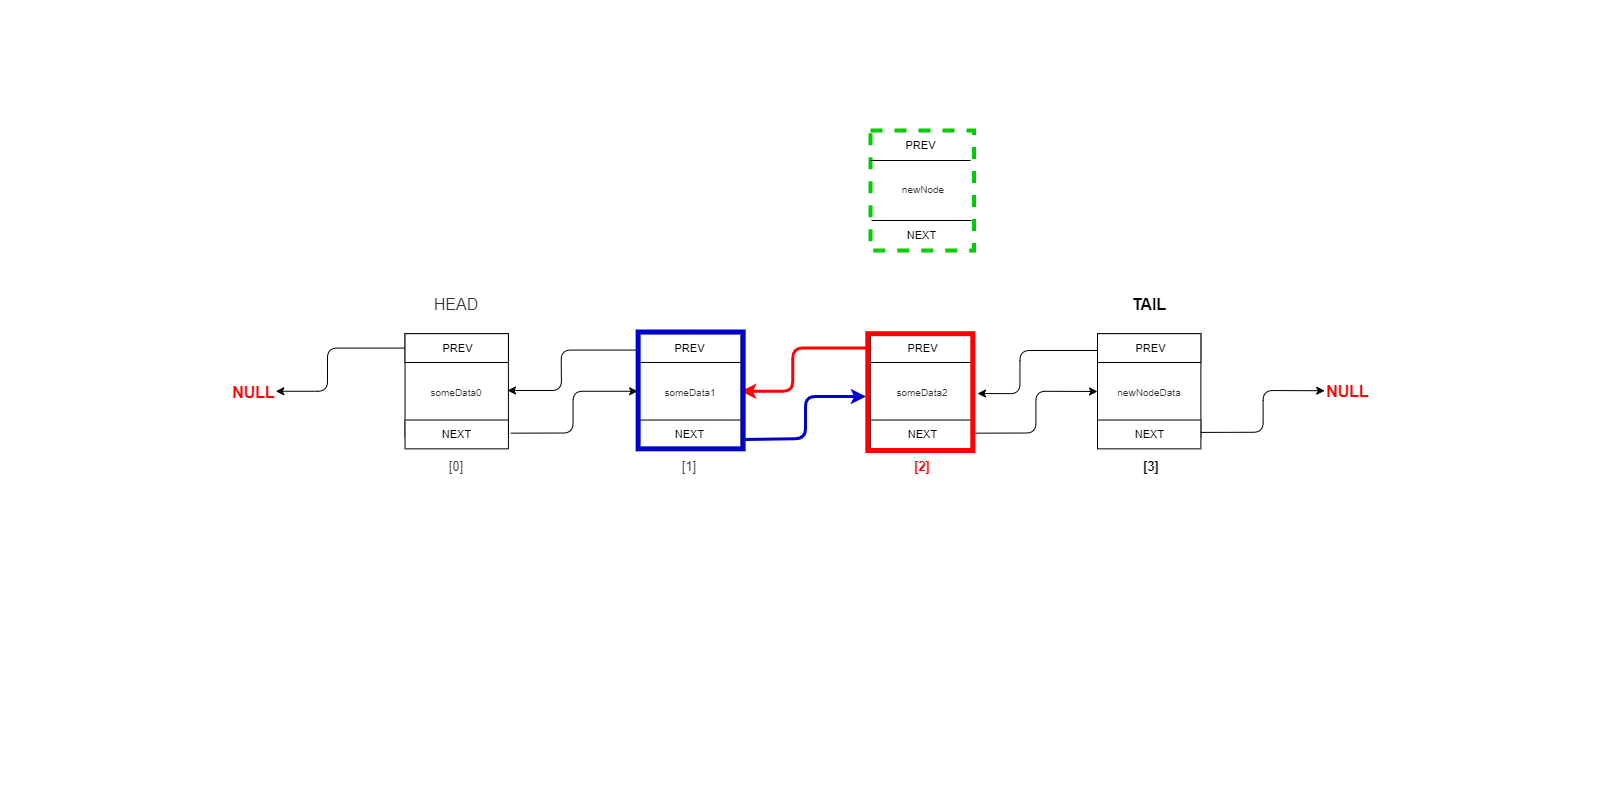
newNode and Index to Insert At

newNode.next = current;
current.previous.next = newNode;
newNode.previous = current.previous;
current.previous = newNode;
size++ ; return true;
Deleting a Node from the List
This is another set of operations we will need in our LinkedList class, that is deleting Nodes from our list, we will create 3 methods for this removeFirst(), removeLast() and removeAt()
Removing First or Last inserted Node in a List
As mentioned above, we have two methods removeFirst() and removeLast() for this purpose, starting with remove first below
public void removeFirst() {

        head.next.previous = null;

        head = head.next;

        size--;

    }
In the first line of code, we assign null to the previous field of the node that comes after the current Head i.e head.next, This is since the the current head node will be removed, and the node after it will be made the new Head node, and a Head node’s previous field will always be null, so as to terminate it’s end of the List.
In the next line we simply make the Node that comes after the current Head the new Head node, and lastly we decrement the size variable.
    public void removeLast() {
        tail.previous.next = null;

        tail = tail.previous;

        size--;

    }
The logic here is the same as in the removeFirst() function, except it deals with the tail node, that is set the next field of the node before the current Tail to null, set the node preceding the current Tail to be the new Tail, and decrement the size variable.
These two functions can be used by themselves and are also used as a part of the removeAt() method that we will implement below.
Removing a Node from a specified Index
Similar to our insertAt() method, the removeAt() method also uses indexes but to remove the Node at the provided index rather than insert a new Node at it’s place.
We start out with this barebones removeAt() function to which we will add the revelant bits of code as this section progresses.
public void removeAt(int index) {
        // current node is set to head, iteration starts from head
        Node current = head;

        if( index >= size) {
            throw new IllegalArgumentException(Integer.toString(index));
        }

    }
We first declare a current object of type Node and set it to the value of head to use in our loop, then we run a check if the given index is greater or equal to the size of the List, if it is we throw an exception, the next block of code actually deals with the Node removal logic
        if (index == 0) {
            removeFirst();
        } else if (index == size-1) {
            removeLast();
        } else {

            for(int i = 0; i != index; i++) {
                current = current.next;
            }

            // The node after current's prev now points to the prev node of current
            current.next.previous = current.previous;

            // The node before current's next now points to the node the comes after current
            current.previous.next = current.next;

            current = null;

            size--;

        }
Now in this block of code we run another set of checks, if the provided index is 0 we remove the first Node via the removeFirst() function, if it is the last Node, i.e size-1 since this is a zero indexed list then we use the removeLast() function, and lastly if it passes both these checks and is infact and index somewhere in between, is where we run our meat-and-potatoes code of our method.
Now as we have used earlier, we use a for loop that iterates till it reaches the value of index, and the List is iterated through on the Node side by current = current.next, once this node is found, we move onto the two most important statements in this code block.
current.next.previous = current.previous;
In this statement, we assign the Node that comes before the current node, i.e current.previous to the previous field of the Node that comes after our current node i.e current.next.previous.
Earlier, the previous field of our current.next or node-after-current would be the current node, by doing this we remove the previous link between our current node and the node after it.
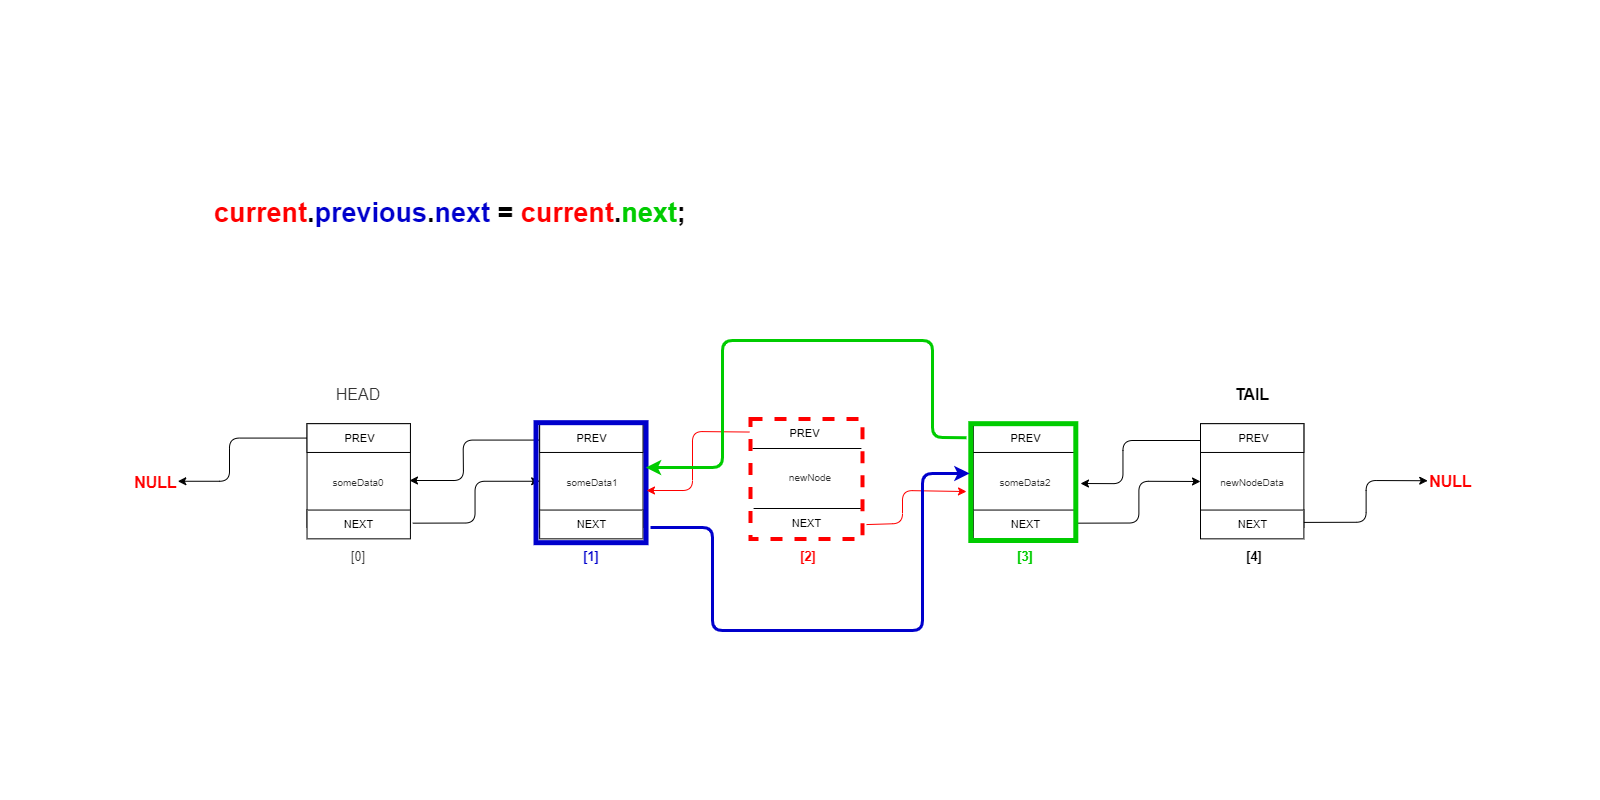
current.previous.next = current.next;
The earlier statement dealt with the previous links to our current Node, the one which we want to delete, and this statement deals with the next links.
Here the Node after our current Node that is accessed by current.next is assigned to to the next field of the Node that comes before our current Node.
Now the Node that came before our current Node won’t point to our current Node in it’s next field, but to the Node after our current Node.
With these two statements, both the previous and next references to our current Node from both the preceding and succeeding nodes to it are removed and so it is not a part of our Linked list, and hence “deleted”, L
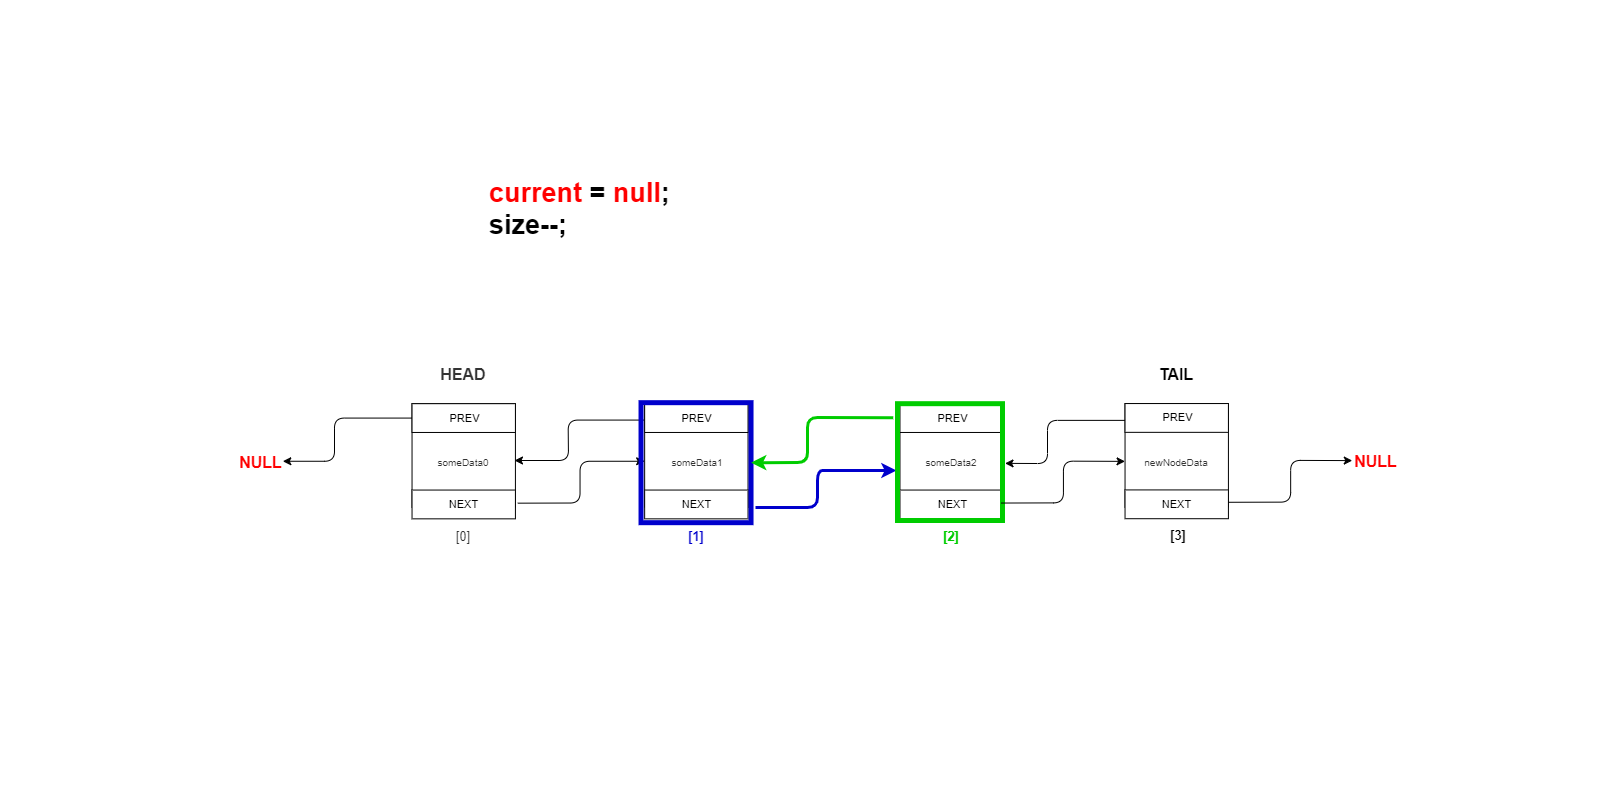
            current = null;
            size--;
Lastly we simply set the current node to null, and decrement the size.
The image gallery of three diagrams below illustrating the above should increase your understanding.
newNode and Index to Insert At
newNode.next = current;
current.previous.next = newNode;
newNode.previous = current.previous;
Conclusion
This is the end of the article, hopefully you enjoyed reading it and it improved your understanding of implementing Linked Lists from scratch in Java, iterating through them and insertion, removal and insertion/removal-in-place operations.
Full source code of the LinkedList implemented here is on GitHub